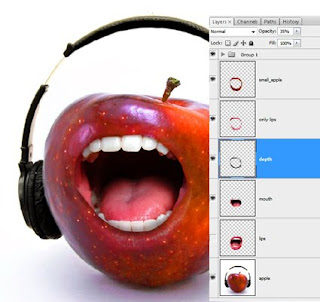
In this tutorial you will learn how to make an apple, already listen to the music, sing.
Take this image with an apple and this one with the mouth and at the end of the tutorial you will have this:Open the image with the apple in Photoshop. Open the second one also. Copy it (Ctrl + A), go to the image with the apple and paste the selection over it. Photoshop will put the selection into a new layer. Lower the opacity of this layer a little – just so you can see the apple – and hit Ctrl + T to make the mouth smaller in order to fit the apple’s form.
Take the Pen Tool and select the lips like you see in the images below.
After you’ve selected the outline of the lips press the right mouse button and choose Make Selection. Leave the Feather Radius 0 and press OK. Now you have the selection of the mouth. Go to Select > Inverse. Photoshop will inverse the selection and now the face will be in the selection. Press the Delete key to erase it.
Let’s select the mouth again, but this time without the lips.
Copy the selection and then paste it – remember that you don’t have to make a new layer, Photoshop will create one and put the selection there.
You can notice that you can’t see clearly what is in the layer’s thumbnail. So let’s make it bigger!
Do like you see in the images below.
Do like you see in the images below.
And here you can see the difference:
Go to the layer with the apple. Take the Eliptical Marquee Tool and select a part of the apple.
Copy the selection, paste it, and put the new layer between the layer with the mouth and the one with the lips.
And now, because when I first selected the mouth I hit Ctrl + C instead of Ctrl + X in order to leave the lips in a separate layer, I have to select the lips again. But there is an easy way to do that.
Hold down Ctrl key and click on the layer’s thumbnail that contains the mouth and the lips. In my case this layer is named “lips” (see the picture above). While still holding down Ctrl key also press the Alt key in order to substract from the selection. And now click on the layer’s thumbnail containing the mouth. When you need to add to selection press Shift key instead of an Alt key.
Make sure the layer with the apple is active (see step 5) and go to Select > Inverse then hit the Delete key.
What you will have is this:
What you will have is this:
The lips now have apple texture.
And this is what you have so far:
And this is what you have so far:
Place the layer containing the mouth under the ones with the lips.
Select the layer with the apple texture lips and turn down the opacity of the layer until you can see the real lips through. Take the Eraser Tool, set the Hardness to 0 and start to erase from the outside of the lips, so the outline of the lips becomes invisible.
Create a new layer, under the one with the lips, take the Brush Tool, set the Hardness to 0 , set the foreground color to black and follow the outline of the lips to give a little depth to the mouth. Take the Eraser Tool and delete where you think it’s necessary.
And this is the final image. The apple is now singing.
Author: Adri
csscreme.com
csscreme.com


